February 28, 2014

wpa_supplicant with DoD PIV / CAC card

EAP-TLS and EAP-PEAP/MS-CHAPv2 authentications

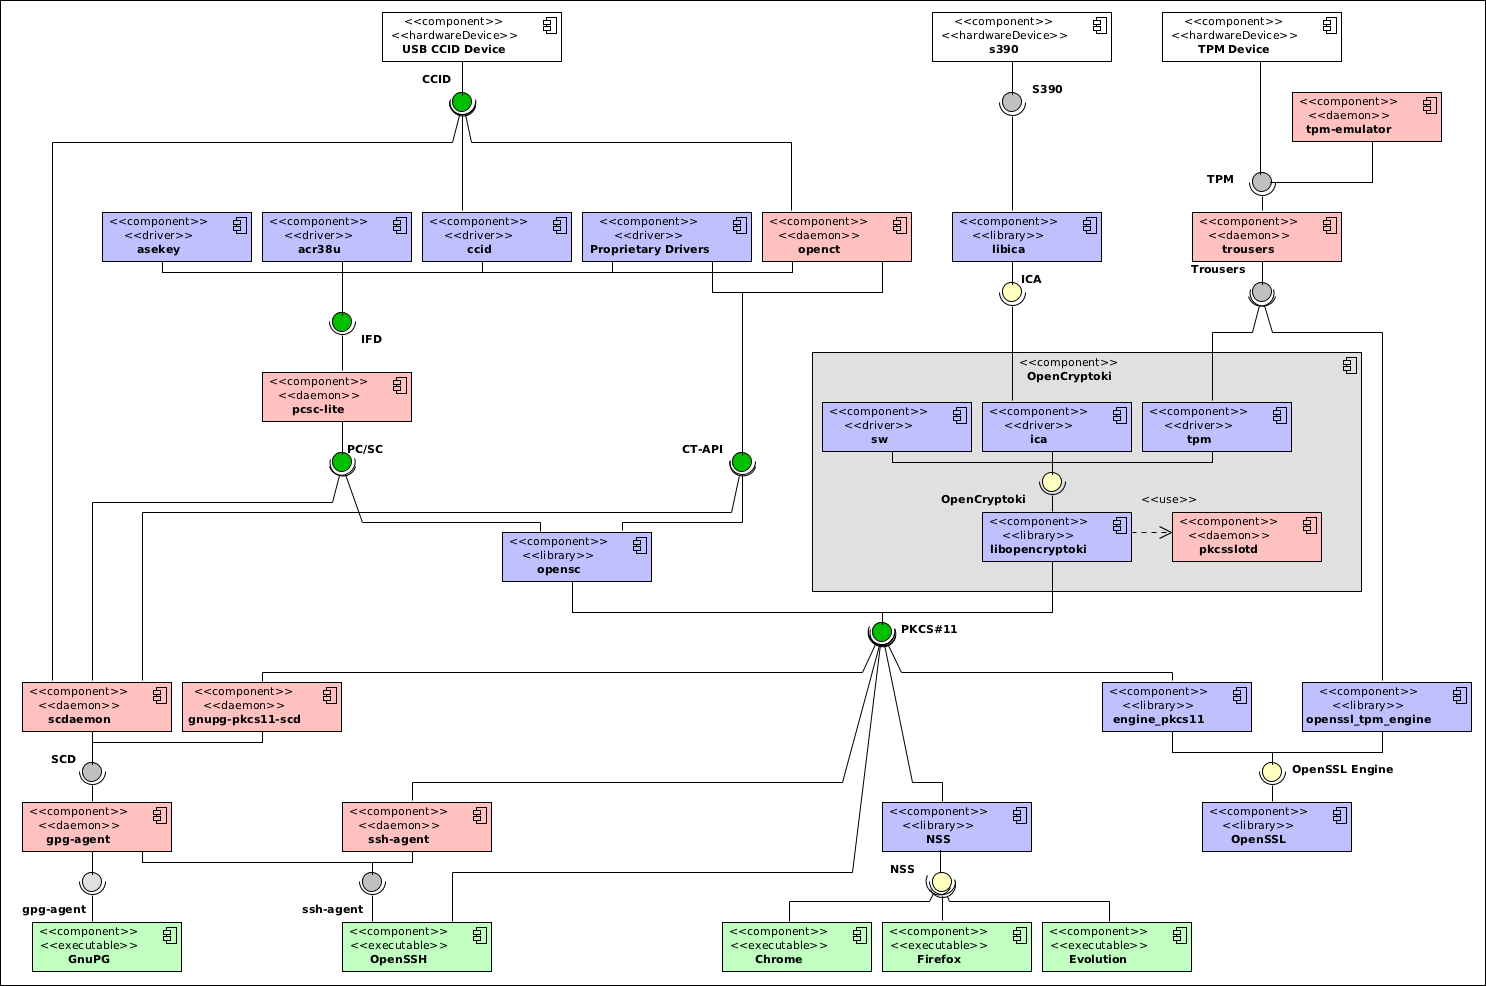
For EAP-TLS, you will need to read the cert from the PIV card to a local file. You  can use the following command:
pkcs11-tool --module /usr/local/lib/opensc-pkcs11.so -r -y cert -d 01 -o cac-cert.der

wpa_supplicant.conf:

ctrl_interface=/var/run/wpa_supplicant
eapol_version=1
#ap_scan=1
#fast_reauth=0
pkcs11_engine_path=/usr/lib/ssl/engines/engine_pkcs11.so
pkcs11_module_path=/usr/local/lib/opensc-pkcs11.so

network={
    ssid="test"
    key_mgmt=WPA-EAP
    eap=PEAP
    proto=RSN
    pairwise=CCMP
    group=CCMP
    identity="myname"
    password="mschappass"
    ca_cert="CA.pem"
    phase1="peaplabel=0"
    phase2="auth=MSCHAPV2"
    priority=10
}

network={
    ssid="test-tls"
    key_mgmt=WPA-EAP
    eap=TLS
    proto=RSN
    pairwise=CCMP
    group=CCMP
    identity="john@abctech.com"
    ca_cert="CA.pem"
    client_cert="cac-cert.der"
    priority=10
    engine=1
    engine_id="pkcs11"
    key_id="1:01"
    pin="77777777"
}

#PEAP-EAP-TLS-SMARTCARD
network={
    ssid="test-peap-eap-tls"
    key_mgmt=WPA-EAP
    eap=PEAP
    proto=RSN
    pairwise=CCMP
    group=CCMP
    anonymous_identity="noname@noname.com"
    ca_cert="/etc/CA.pem"
    identity="sean"
    client_cert2="/tmp/cac-cert.der"
    phase1="peapver=0"
    phase2="auth=TLS"
    priority=10
    engine2=1
    engine2_id="pkcs11"
    key2_id="1:01"
    pin2="77777777"
}

#key_id 1:01 means card reader at slot #1, and key id 01 on the card

To convert JTIC CA files to PEM format:

openssl pkcs7 -print_certs -in Certificates_PKCS7_v4.0.1_JITC.pem.p7b -out JITC-CA.pem


To Valid pin, have the card sign a simple file:

pkcs11-tool --sign  -m SHA1-RSA-PKCS --input-file /etc/passwd --output-file /tmp/signature --pin 12345678

If signed successfully, then the pin is correct.


---Just for testing purpose---

To test your openssl engine

run: openssl, then


> engine -vvvv dynamic -pre SO_PATH:/usr/lib/ssl/engines/engine_pkcs11.so \
-pre ID:pkcs11 -pre LIST_ADD:1 -pre LOAD -pre VERBOSE \
-pre MODULE_PATH:/usr/local/lib/opensc-pkcs11.so  

> req -engine pkcs11 -new -key 1:01 -keyform engine -x509 -out cert.pem -text

it will ask you for the PIN, and should generate a cert.pem if everything works.


------------Hostapd (including functioning as WiFi AP and RADIUS server)-----
hostapd.conf:
interface=wlan0
logger_syslog=-1
logger_syslog_level=2
logger_stdout=-1
logger_stdout_level=2
ctrl_interface=/var/run/hostapd
ctrl_interface_group=0
ssid=test-tls
hw_mode=g
channel=1
beacon_int=100
dtim_period=2
max_num_sta=255
rts_threshold=2347
fragm_threshold=2346
macaddr_acl=0
auth_algs=3
ignore_broadcast_ssid=0
wmm_enabled=1
wmm_ac_bk_cwmin=4
wmm_ac_bk_cwmax=10
wmm_ac_bk_aifs=7
wmm_ac_bk_txop_limit=0
wmm_ac_bk_acm=0
wmm_ac_be_aifs=3
wmm_ac_be_cwmin=4
wmm_ac_be_cwmax=10
wmm_ac_be_txop_limit=0
wmm_ac_be_acm=0
wmm_ac_vi_aifs=2
wmm_ac_vi_cwmin=3
wmm_ac_vi_cwmax=4
wmm_ac_vi_txop_limit=94
wmm_ac_vi_acm=0
wmm_ac_vo_aifs=2
wmm_ac_vo_cwmin=2
wmm_ac_vo_cwmax=3
wmm_ac_vo_txop_limit=47
wmm_ac_vo_acm=0
ieee8021x=1
eapol_key_index_workaround=0
eap_server=1
eap_user_file=hostapd.eap_user
ca_cert=./JITC-CA.pem
server_cert=./hostapd.server.pem
private_key=./hostapd.server.key
private_key_passwd=mypass
own_ip_addr=127.0.0.1
auth_server_addr=127.0.0.1
auth_server_port=1812
auth_server_shared_secret=radiussecret
radius_server_clients=./hostapd.radius_clients
radius_server_auth_port=1812
wpa=3
wpa_key_mgmt=WPA-EAP
wpa_pairwise=CCMP
rsn_pairwise=CCMP


hostapd.eap_user:

#john uses EAP-TLS and PEAP, everyone else uses PEAP and MSCHAPv2
"john@abctech.com"        TLS
* PEAP
"john"        MSCHAPV2        "mschappass"    [2]

hostapd.radius_clients:
# RADIUS client configuration for the RADIUS server
127.0.0.1 radiussecret

openssl how to add a config section

use this: (The magic is in the keyword openssl_conf which is recognized by openssl)

openssl_conf = openssl_def

[openssl_def]
engines = engine_section

[engine_section]

foo = pkcs11_section

[pkcs11_section]
dynamic_path = /usr/local/lib/engine_pkcs11.so
engine_id = pkcs11
default_algorithms = ALL
#default_algorithms = RAND,RSA
init = 1

PEAP certificates, signing requirements and examples


There are only minor differences between standard SSL certificates used by secure web sites and those
used with PEAP on 802.1x wireless networks.

With PEAP the SID of the network, rather than your organizations domain must match the common name
(cn) of the certificate.  Additionally an EKU (Enhanced Key Usage) for Server Authentication (OID
1.3.6.1.5.5.7.3.1) must be specified when creating your public certificate or signing request.

[ PEAP ]
extendedKeyUsage = 1.3.6.1.5.5.7.3.2
extendedKeyUsage = 1.3.6.1.5.5.7.3.1

[ clientAuth ]
extendedKeyUsage = 1.3.6.1.5.5.7.3.2

[ serverAuth ]
extendedKeyUsage = 1.3.6.1.5.5.7.3.1


In these examples we will use the OpenSSL utility to create a Certificate Signing Request (CSR) used with a third party certificate authority such as Verisign or Thawte.  We will also generate a ‘self-signed’ certificate that does not require a certificate authority but does require users to first accept your certificate as valid on a one time basis depending on the supplicant and its configuration.


Example creating a certificate signing request for a certificate authority
openssl req -new -nodes -keyout private.pem -out public.csr -extensions PEAP -config openssl.cnf

The output file public.csr is processed by your certificate authority (CA), which will return a signed
certificate file to you.  Combine private.pem with the certificate returned from the CA into a single file.  This file becomes the  ‘PEAP Certificate’ file.  You will likely also need the CA’s certificate chain file if one is required.  This file becomes the ‘PEAP CA Certificate’.


Example creating a ‘self-signed’ certificate

openssl req -new -x509 -key private.pem -out public.pem -extensions PEAP -config openssl.cnf -days 5000

February 19, 2014

qt with gif support

Put the plugin libqgif.so under <executable dir>/imageformats/libqgif.so

libqgif.so should be under QT-SRC/plugins/imageformats

February 14, 2014

Linux AF_PACKET raw socket incoming and outgoing

In Linux, one use socket(family, type, protocol) to create a socket.  Some tips about raw socket:

1. To capture packets with Ethernet header, use family AF_PACKET

2. PF_PACKET is the same as AF_PACKET. Actually PF_* is the same as AF_*. AF_ prefix is the new way of calling them. (Address Family)

3. When using PF_PACKET,  type can either be SOCK_RAW or SOCK_DGRAM

4. protocol can be ETH_P_IP, ETH_P_ALL, etc. The complete list is under Linux source tree include/uapi/linux/if_ether.h

5. IMPORTANT ETH_P_ALL captures all incoming and outgoing packets. Other protocols only capture incoming packets. (See this question: http://stackoverflow.com/questions/20864962/does-capturing-outgoing-frames-using-linux-raw-socket-requires-eth-p-all)

Also remember to bind the raw socket to the particular network interface. Man 7 af_packet for details.

February 13, 2014

Change TI Sitara DM816x CPU Speed

Variables:

fr=27Mhz ,

Variables defined in U-boot source code:
P=1,
N=64
FREQ integer part = 0x0B
FREQ float part = 0x851EB7 (the maximum if 0xFFFFFF), so 0x851EB7 is around 0.52

fvco=(N/P)*fr=64*27MHz = 1728MHz
fs=(fvco*k)/FREQ, where k=8 (always)
   = (1728*8)/11.52=1200MHz

You can tweak FREQ (integer and float part) to adjust CPU frequency.

For example, setting it to 15 (FREQ.integer=0x0E, FREQ.float=0) will change the CPU speed to 987Mhz.

The theoretic maximum is around 1500Mhz, but the TI tested max speed is 1200MHz.

February 7, 2014

Linux switch_root vs pivot_root vs chroot

1. pivot_root can/should be used together with chroot
     
       pivot_root new_root put_old
       pivot_root moves the root file system of the current process to the
       directory put_old and makes new_root the new root file system.  

       cd new_root
       pivot_root . old-root
       exec chroot . command
       umount /old-root
Note that chroot must be available under the old root and under the new root, because pivot_root may or may not have implicitly changed the root directory of the shell.

2. switch_root newroot init [arg...]
       switch_root moves already mounted /proc, /dev and /sys to newroot and
       makes newroot the new root filesystem and starts init process. switch_root       is typically used with initramfs

       WARNING: switch_root removes recursively all files and directories on
       the current root filesystem.
     
The following shell script fragment demonstrates how to use switch_root:
  # First, find and mount the new filesystem.
  mkdir /newroot
  mount /dev/whatever /newroot

  # Unmount everything else you've attached to rootfs.  (Moving the filesystems
  # into newroot is something useful to do with them.)

  mount --move /sys /newroot/sys
  mount --move /proc /newroot/proc
  mount --move /dev /newroot/dev

  # Now switch to the new filesystem, and run /sbin/init out of it.  Don't
  # forget the "exec" here, because you want the new init program to inherit
  # PID 1.

  exec switch_root /newroot /sbin/init

February 5, 2014

css z-index

The Natural Stacking Order

In an HTML page, the natural stacking order (i.e. the order of elements on the Z axis) is determined by a number of factors. Below is a list showing the order that items fit into a stacking context, starting with the bottom of the stack. This list assumes none of the items has z-index applied:
  • Background and borders of the element that establish stacking context
  • Elements with negative stacking contexts, in order of appearance
  • Non-positioned, non-floated, block-level elements, in order of appearance
  • Non-positioned, floated elements, in order of appearance
  • Inline elements, in order of appearance
  • Positioned elements, in order of appearance
The z-index property, when applied correctly, can change this natural stacking order.
Of course, the stacking order of elements is not evident unless elements are positioned to overlap one another. Thus, to see the natural stacking order, negative margins can be used as shown below:
Grey Box
Blue Box
Gold Box
The boxes above are given different background and border colors, and the last two are indented and given negative top margins so you can see the natural stacking order. The grey box appears first in the markup, the blue box second, and the gold box third. The applied negative margins clearly demonstrate this fact. These elements do not have z-index values set; their stacking order is the natural, or default, order. The overlaps that occur are due to the negative margins.

Why Does it Cause Confusion?


Although z-index is not a difficult property to understand, due to false assumptions it can cause confusion for beginning developers. This confusion occurs because z-index will only work on an element whose position property has been explicitly set to absolute, fixed, or relative.

Source: http://coding.smashingmagazine.com/2009/09/15/the-z-index-css-property-a-comprehensive-look/

February 3, 2014

how to make samba follow symbolic links

Make sure you have the following in your smb.conf file

1. in [global] section, add
    unix extensions = no

2. in your particular directory section add
    follow symlinks = yes
    wide links = yes

Restart smbd service and you should be good to go