TEW-652BRP is one of the cheapest 11N wireless routers (availabe around $30). It can be flashed with Dlink DIR-615 firmware and openwrt firmware.
The bootloader is u-boot, and it has a built-in web server for firmware upgrade. To unbrick/upgrade, following these steps:
1. unplug power
2. hold reset button using a pin
3. plug power back while holding the reset button
4. wait around 20-30s.
5. You should see the STATUS LED (the one next to power) blink slowly. This is the indication that the device is in u-boot web server mode
6. Set your PC IP address to 192.168.0.2. The router IP address is 192.168.0.1
7. Browse to 192.168.0.1, upload the firmware. The firmware is required to use dlink hardware ID (ending with .2)
8. Wait until it is 100% finished (indicated on the screen), and then wait another 30s, and repower the router (it does NOT reboot automatically).
9. That's it. The default Dlink firmware IP address is 192.168.10.1
August 31, 2009
August 25, 2009
trace inter-process communication
"strace" and "lsof" are two very powerful tools to debug running processes in a Linux system.
Use "lsof -p PID" to find out the socket/fifos a process is using
Use "lsof -p PID -Pn" to have lsof show ip and port number instead of names
Use [ strace -p 24846 -ewrite,read -s 1024 -xx 2>&1 | grep -E "^write\(7|^read\(6" ] to trace the real-time read/write of the process
Use "lsof -p PID" to find out the socket/fifos a process is using
Use "lsof -p PID -Pn" to have lsof show ip and port number instead of names
Use [ strace -p 24846 -ewrite,read -s 1024 -xx 2>&1 | grep -E "^write\(7|^read\(6" ] to trace the real-time read/write of the process
August 14, 2009
Set the sort order of file open dialog
Set the order you wish to see using Windows Explorer, hold Ctrl and press
the Close button on the window. The sorting order for the Open/Save dialog
should be changed :-)
I wish this is documented somewhere by the guys in Redmond.
the Close button on the window. The sorting order for the Open/Save dialog
should be changed :-)
I wish this is documented somewhere by the guys in Redmond.
August 5, 2009
ASUS Restore firmware /unbrick
ASUS WL-500gP V2 is a great router. One of good things is you can always unbrick it.
To unbrick it. unplug it, hold on the "restore" button, plug power, and wait for 5 seconds, the power LED should go into slow blinking. This shows that the box is in recovery mode.
Connect a PC to a LAN port, and make sure you disable all other network connections on the PC you are using to flash. This is the key!!
Set you PC Ethernet IP to 192.168.1.5/255.255.255.0. You will NOT be able to ping 192.168.1.1. That is OKAY.
Now fire up the ASUS Firmware Restoration utility (came with your box in the CD or downloadable from ASUS website in Utilties), and load the firmware.
Regardless whether your firmware is good or bad, you can always use this method to reflash the box.
DD-WRT sets the NVRAM password. I had to restore the firmware to ASUS firmware and press RESTORE button for more than 10 seconds, and reboot to erase the NVRAM password. Then I reflash my box to tomato firware.
VMWare Player hidden vmnetcfg
2/28/2003 Update:
In VMWare Player 5 you need to:
go to the vmware-directory and run in elevated cmd.exe-box
rundll32.exe vmnetui.dll VMNetUI_ShowStandalone
http://communities.vmware.com/message/2155960#2155960
Original Post:
I like VMWare player for its stability but wanted to have more control on the network configuration. For example, I wanted to configure which physical network card to map to the bridged network in vmware player. I dug around the internet but did not find any. Fortunately when scanning through the EXE files installed by VMWare Player I found what I was looking for: vmnetcfg.exe.
So simply go to the following directory in your Windows and run "vmnetcfg"
C:\Program Files\VMware\VMware Player>vmnetcfg
And you should see a window popping up where you can configured all network configurations.
I think the configurations are saved to somewhere in the registry. After changing my bridged network map, and rebooted my virtual Linux, the bridged network worked great.
You can also changed DHCP settings, NAT settings (port forwarding on both TCP and UDP), and all kinds of other interesting things. Be sure to check it out if you use vmware player.
This is the screenshot: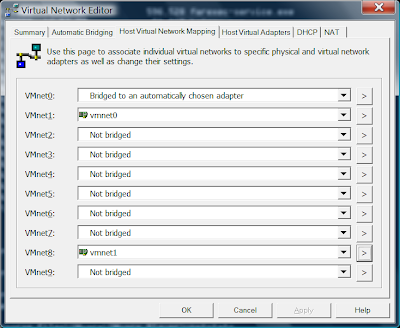

August 3, 2009
Change Linux Ethernet Speed and Duplex
Task: Change the speed and duplex settings
Setup eth0 negotiated speed with mii-tool
Disable autonegotiation, and force the MII to either 100baseTx-FD, 100baseTx-HD, 10baseT-FD, or 10baseT-HD:# mii-tool -F 100baseTx-HDSetup eth0 negotiated speed with ethtool
# mii-tool -F 10baseT-HD# ethtool -s eth0 speed 100 duplex fullTo make these settings permanent you need to create a shell script and call from /etc/rc.local (Red Hat) or if you are using Debian create a script into the directory /etc/init.d/ directory and run update-rc.d command to update the script.
# ethtool -s eth0 speed 10 duplex half
Read man page of mii-tool and ethtool for more information.
source: http://www.cyberciti.biz/faq/linux-change-the-speed-and-duplex-settings-of-an-ethernet-card/
Subscribe to:
Posts (Atom)